

Photo by Braden Collum on Unsplash
Deploy .NET webapp on AWS App Runner with VPC Connector
Connect AWS App Runner to an existing service in a VPC


This article starts with introduction on AWS App Runner. Then moves to VPC Connector, the feature that enables the connectivity between an App Runner service and a service in a VPC.
It shows two different options to deploy an ASPNET web application that connects to a RDS database: the AWS web console and the AWS .NET deployment tool.
- Introduction
- AWS App Runner
- Demo
- Deploy using the AWS Console
- Deploy using AWS .NET deployment tool
- Conclusion
This article is also available in Italian here.
Introduction
Web applications, in their various forms, are ubiquitous pieces of everyday technology. Be they mobile apps that allow us to check our bank accounts or web sites where you can purchase the latest clothing fashion. Web applications are a fundamental part of our daily lives.
If you are using a mobile app, it is probably sending data to a backend API - one that implements the real business rules - and contains all the other important logic required to perform the expected operations.
In the past, we hosted these web applications on virtual machines, located mostly in our company’s on-premises server environment, or in a datacenter.
For an app that may have simpler functionality or a limited expected user base, this might be a suitable option. Indeed, if your company is not a startup and you already have some server infrastructure in-house, just publishing the app on the web server and exposing it through the Internet would be a viable and cost-effective solution.
With some luck, if your business idea is very good and the user base goes stratospheric - maybe the app goes viral on social media or performs operations for an entire region or country that sees wide-spread adoption. Now, one single virtual machine is no longer enough. You could start scaling your system by perhaps adding more processing power or as much RAM as you physically can. Then you add a second virtual machine, so now you need to put a load balancer in front of the two machines. But is it enough? How many more virtual machines does it take, or more RAM, or more CPU? As you can see, to scale an app to allow it to perform efficiently for all users is not an easy task. It is also expensive, and you require more and more system administration and server knowledge to scale it well and to monitor it.
One of the main goals of AWS is to simplify the journey to the cloud for all its customers, providing services and tools that help them with the migration of their existing on-premises virtual machines and datacenter elements to the AWS cloud. There are services like AWS Elastic Beanstalk that, provided with a ZIP file containing the application’s artifacts, can provision and configure all of the necessary infrastructure and in addition would enact the deployment in just a couple of minutes.
AWS Elastic Beanstalk is a very powerful and versatile service. Out of the box, it supports many runtimes and Docker images. It has been running since January 2011.
However, it provisions only a base environment, together with a base configuration for your app. If you are deploying an application into a production environment, you’ll probably have to tweak some parameters or even log into the EC2 instances to install additional software or to do maintenance. You may also be required to alter the configuration of the load balancer.
As you can see, quite a lot of system administration knowledge is indeed still required.
AWS App Runner to the rescue!
Originally released in May 2021, AWS App Runner aims to simplify things, to remove, as much as possible, the inherent need for the infrastructural knowledge required to deploy applications - even simple web applications - to the AWS cloud.
It allows two methods of providing your application code for deployment: via a Docker image or through a Git repository.
Once provided the source code, the process asks some basic questions to help fine tune the configuration, and then it provisions the required environments automatically. In a couple of minutes, your application is publicly accessible and ready to use.
This service uses AWS Fargate instances, fully managed by AWS, so you don’t have to care about them. It also automatically scales your app.
VPC connectivity
When AWS App Runner was first released, it did not initially have support for connection to a VPC. Instead, the team in AWS were more interested in understanding how actually people use it. So, they put an issue in the App Runner GitHub roadmap repository to ask if the connectivity with a VPC is something that anybody was interested in. As it turns out, this feature is very important, especially if your web app connects to a database in Amazon RDS. The issue was so upvoted by the community that they went ahead and built it! Now, in February 2022, it is finally available.
To setup this configuration, you need some information about the VPC that you want to connect to:
- The name of the subnets that hosts the resource in the VPC
- The name of the security group of the resource
If you want to know how exactly the connection between App Runner and the VPC works, you can read this in depth article: Deep Dive on AWS App Runner VPC networking.
Demo
In this article, we demonstrate how to connect an ASPNET Core web application, hosted in App Runner, with an Amazon RDS SQL Server database.
It is good practice not to store the connection string of the database in the source code of your application, and it should also not end up in the artifact that is the result of the build process.
AWS has a great service for dealing with such things - let’s use the Parameter Store from AWS Systems Manager.
Also, for security reasons, the database should be in a private subnet and not in a public one.
Deploy using the AWS Console
From the AWS Console, navigate to AWS App Runner and click on the Create an App Runner service button.
Here is the first question to answer: Should the service get the source code of the application from a repository, or should it pull an image from a container registry?
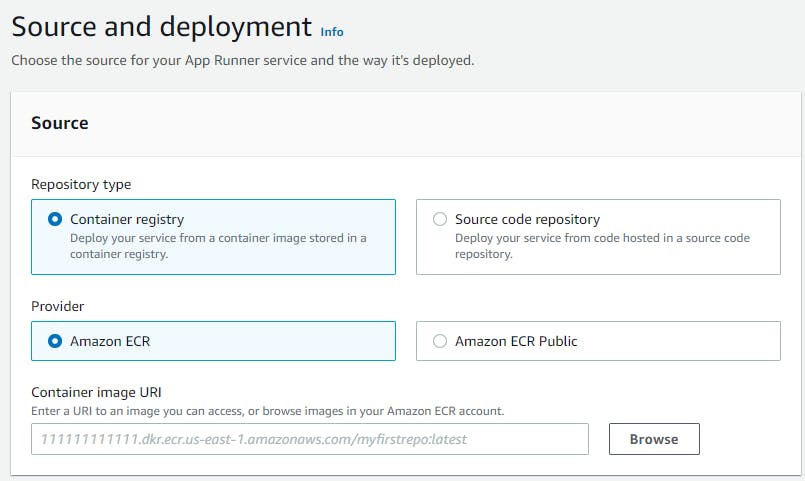
In our sample, we already have an image in Amazon ECR, so we pick the right provider, and we specify the container’s image URI.
We can then declare how to trigger the deployment of the application.
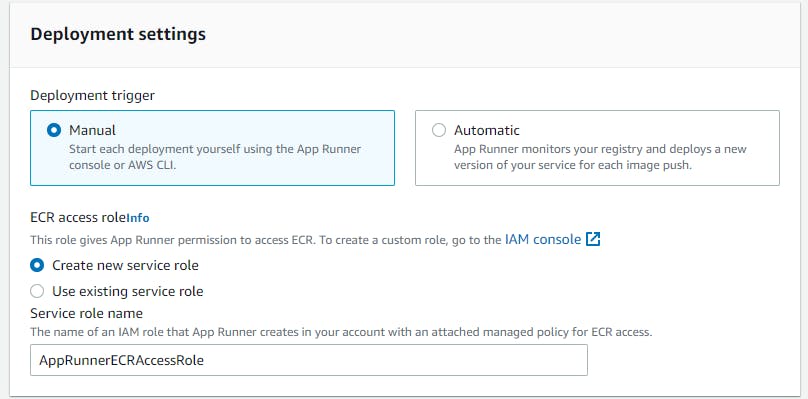 For this demo, a manual deployment is fine.
We must also provide a Service Role: an IAM Role with the policy to allow App Runner to interact with the container registry. If we already have a pre-existing role, one that we want to use, we can select it or we can ask the service to create a brand new one.
Next, we configure the service.
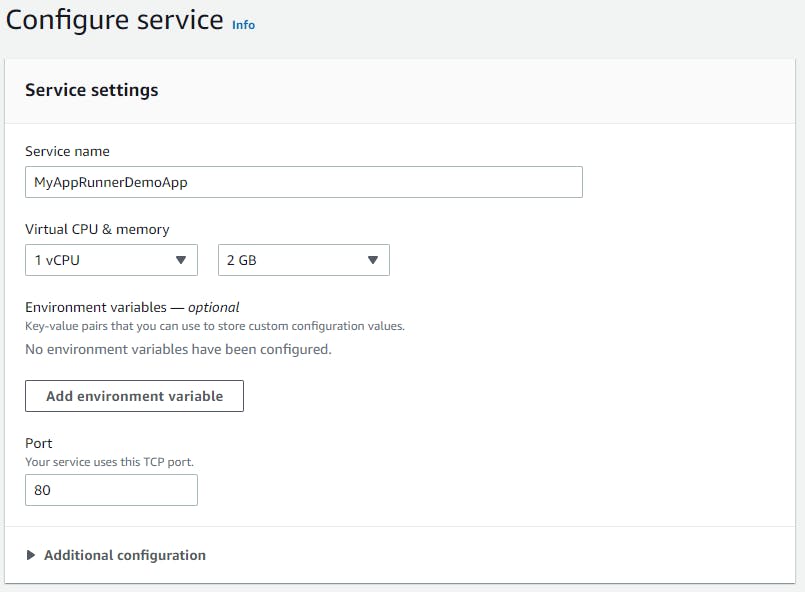
We input the name of the service and some basic information to let App Runner know how much CPU and RAM our application needs to properly function.
Be mindful of the Port parameter. When it is running, by default, the service will perform the health check ping to this port, to understand if your app is healthy.
Next, we enter in the Security section of the configuration.
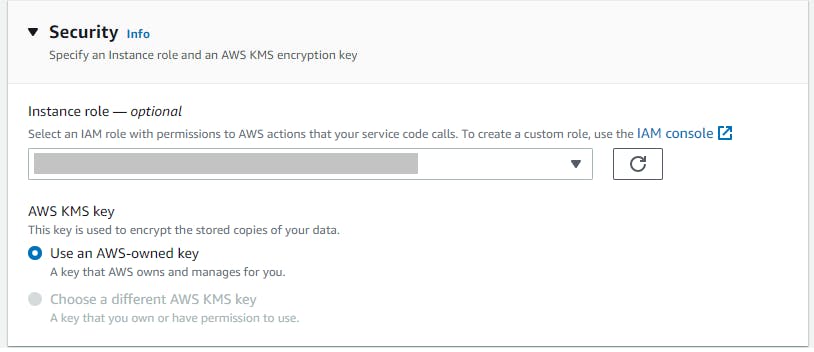 Here, we can specify the Instance role: the IAM Role that will be used to run the application.
If the application is using AWS Systems Manager to retrieve configuration parameters, or it is connecting to a DynamoDB Table, in this section you provide the role with the right policies for the interaction with those and other services.
Next, Networking. Here we create the VPC Connector to enable the app to query the RDS database.
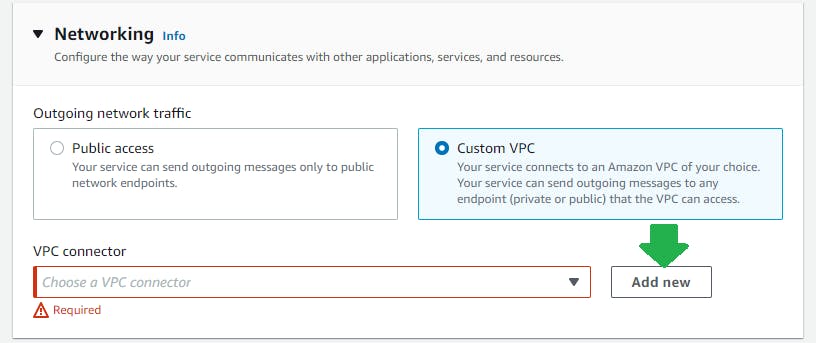 Clicking on the Add New button brings up the popup to input the parameters about the VPC that we are connecting to.
If your database is not in the default VPC security group, remember to enable incoming traffic on port 1433 (SQL Server’s default port).
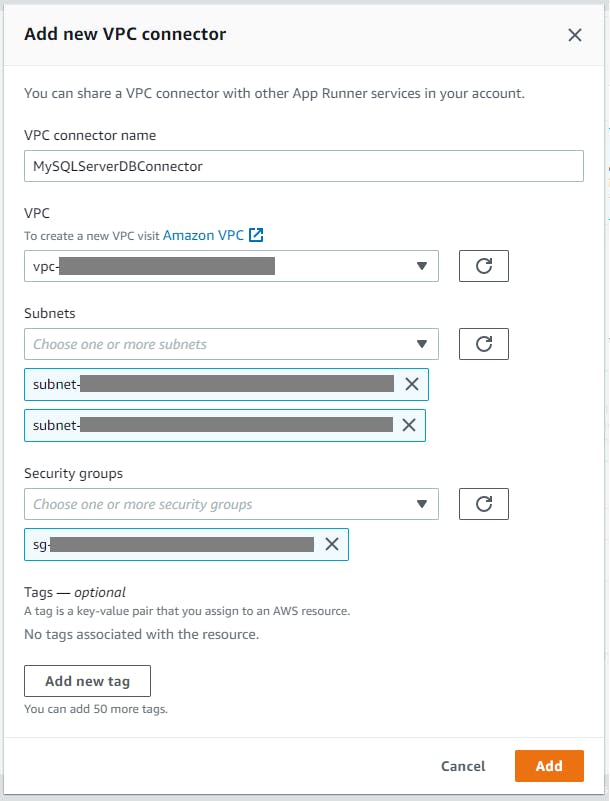 When you click on the Add button, the VPC Connector configuration will be stored in App Runner in a separate section outside of your application’s service, so that it will be possible to reuse it also for other applications.
Once you click on Create & deploy, the provisioning of the necessary resources will start, and your application will be deployed and publicly available.
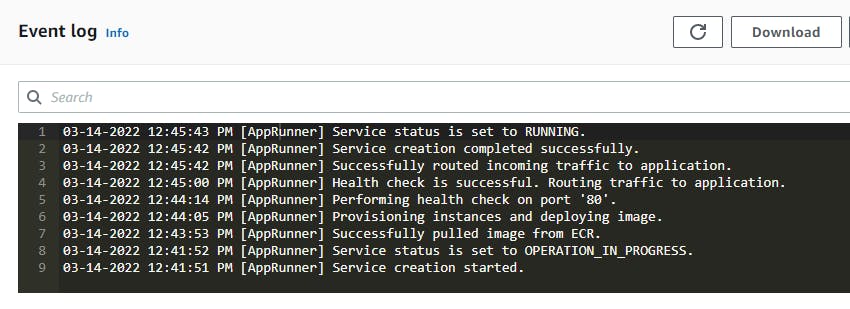 If you connect to the public DNS that App Runner shows when the deployment is done, you can browse the app.
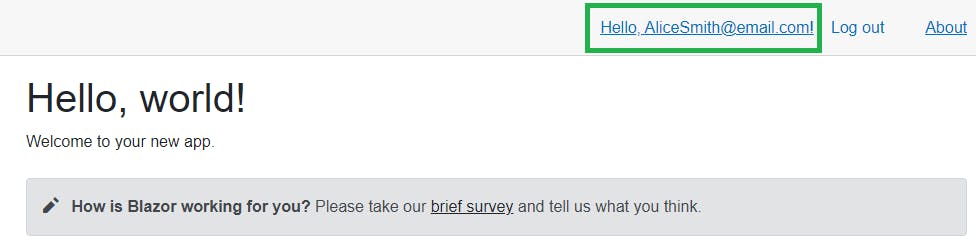
Because the demo app is using the default login functionality provided by the ASPNET Core template, with individual logins stored in the user database, when the user logs-in, they probably will be prompted with a page like the one below:
Deploy using AWS .NET deployment tool
Now, let’s learn how we can use the AWS .NET deployment tool to deploy a web application on AWS App Runner, and to add a VPC Connector in order to query an Amazon RDS database.
This tool is very useful in a real development environment, where you should automate the build and deployment process using Infrastructure as Code (IaC) as much as possible.
It is built on top of the AWS CDK, and it is one of the best options to do IaC on AWS. This means that, while you can use the default deployment recipes provided by the AWS .Net deployment tool, you can also apply some customization and take advantage of newly released CDK features that may not be already available in the provided recipes.
Here we are going to customize the default AWS App Runner deployment recipe to include a VPC Connector.
We need the following tools:
The first thing we do is to generate the AWS CDK project with the code to deploy the infrastructure that our web application need.
We do this with the command line tool.
Once we are in the root of the source code of the web project, we run this command
dotnet aws deployment-project generate
This starts the wizard that will generate our CDK deployment project.
 Here we pick option (2), because we want to use AWS App Runner to deploy the app.
If the project is not stored under source control, the tool will warn you of this; if you are fine with this, just continue with (y).
Hopefully, if everything has worked as expected along the way, there should now be a new folder next to the one with our original web app. By default, this new folder has the name like [web app name].Deployment.
It contains a dotnet project that includes all that is needed to deploy your web app to App Runner - let’s open it now to add some code, to help us create and configure the VPC Connector.
We need to update some NuGet packages - the versions that I used for this demo are as follows:
<PackageReference Include="Amazon.CDK" Version="1.148.0"/>
<PackageReference Include="Amazon.CDK.AWS.AppRunner" Version="1.148.0"/>
<PackageReference Include="Amazon.CDK.AWS.ECS.Patterns" Version="1.148.0"/>
In the AppStack.cs file, we need to add some code to the default template.
In the constructor, there is a section with this comment
// Create additional CDK constructs here
Right after this comment, add the code to create our new VPC Connector:
var myVpcConnector =
    new CfnVpcConnector(this, "MYAppRunnerVpcConnector",
               new CfnVpcConnectorProps
               {
                  VpcConnectorName = "MYAppRunnerConnector",
                  Subnets = new string[] { "subnet1", "subnet2", "subnet3" },
                  SecurityGroups = new string[] { "database-security-group" }
                });
You must update the list of the Subnets in the above with the list of your own VPC subnets. The same applies for the list of SecurityGroups, you specify the SecurityGroup from your Amazon RDS database.
Now that we have the VPC Connector configured, we can associate it to our App Runner service.
To do this, we use a CfnService.
Right after the code that created the VPC Connector above, add these lines of code:
var appRunner = generatedRecipe.AppRunnerService;
if (appRunner != null)
{
  var egressConfig = new CfnService.EgressConfigurationProperty
  {
      EgressType = "VPC",
      VpcConnectorArn = myVpcConnector.AttrVpcConnectorArn
  };
  var network = new CfnService.NetworkConfigurationProperty
  {
       EgressConfiguration = egressConfig
  };
  appRunner.NetworkConfiguration = network;
}
As you can see, this code gets the App Runner Service and updates its networking configuration, associating an egress configuration for our VPC, via our new VPC Connector.
If we have other App Runner Services that talk with this same Amazon RDS database, we just can associate with this VPC Connector also.
Let’s now create the AWS infrastructure and deploy our application.
Run this command:
dotnet aws deploy
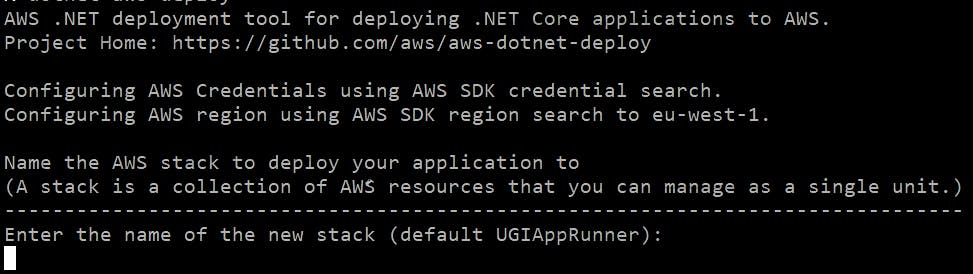
You can leave the default Cloud Formation stack name and just hit ENTER.
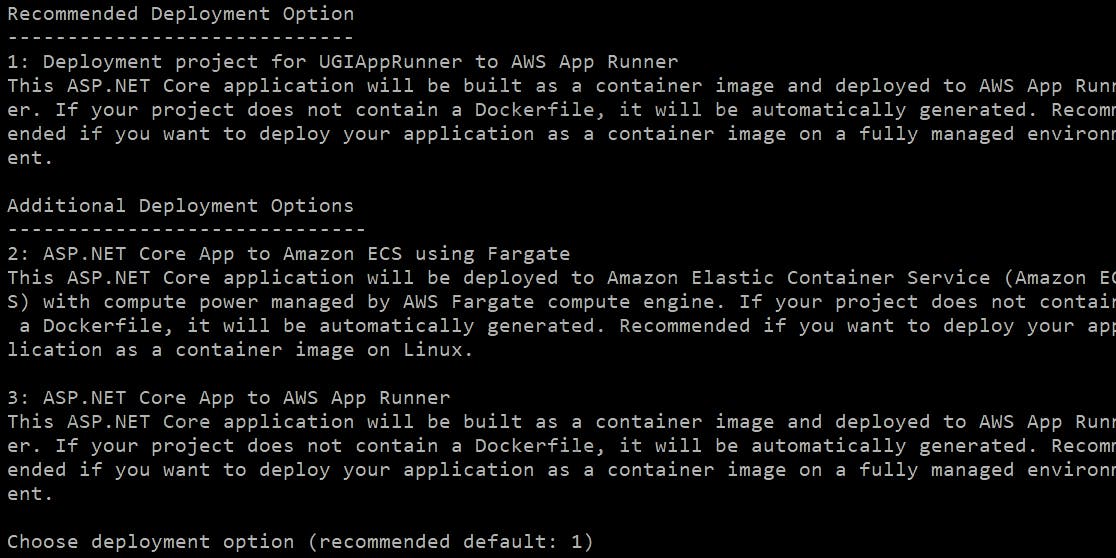 In this step, we proceed with option 1. This is because that it is the option that tells the CLI to use our custom project for the deployment.
Now, we just hit ENTER
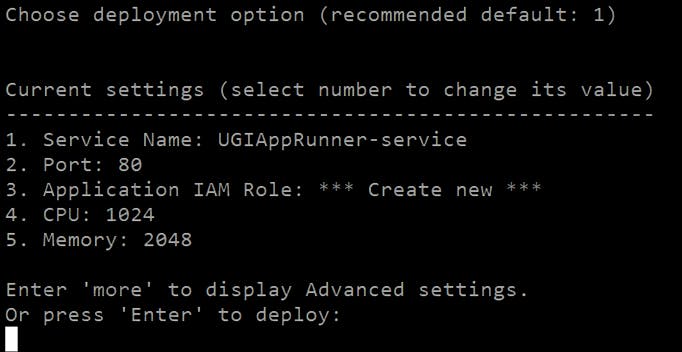 The CLI now shows you what the default configuration is for the tasks that will run your service.
We can leave the default configuration as it is – indeed, maybe it is even too much for our very basic app, so it is fine for our needs.
The CLI now shows you what the default configuration is for the tasks that will run your service.
We can leave the default configuration as it is – indeed, maybe it is even too much for our very basic app, so it is fine for our needs.
However, because the app is going to retrieve the database connection string from the Parameter Store in AWS Systems Manager, we must tell App Runner what the proper IAM role that the app must use at runtime.
To do this, we enter more in the screen above:
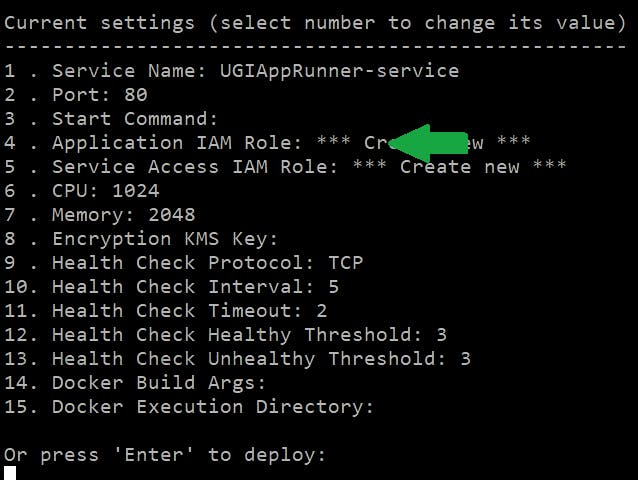 And we pick option 4 and in the next step:
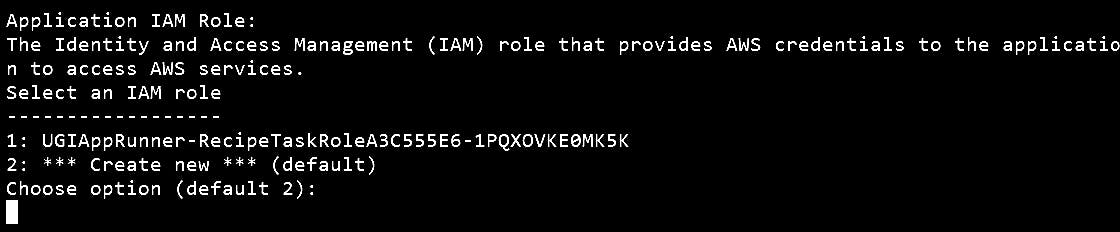 The CLI will suggest a feasible IAM Role (option 1) already in our AWS account, that would have the right policies for App Runner. Indeed, we already preconfigured this role with the configuration for our app earlier.
So, pick option 1 and you are good to go.
Thereafter, the deployment starts and the CLI shows a lot of interesting things, to help you understand the workings of the process – following this would gain you a lot of innate knowledge of the process itself.
Once the deployment is completed, you will see in the CLI the public DNS you can then use to reach your application.

Of course, instead of going through each step of the CLI, it is somewhat better to associate the IAM role through the AWS CDK, with just a line of code or even using the configuration file (appsettings.json) in the deployment project.
Keep in mind that, when you update a configuration via the CLI wizard, each change is then stored into this configuration file.
Conclusion
The purpose of this article was to show you some of the steps that would help with the better understanding of the configuration points needed to achieve connectivity between the App Runner service and your RDS database (or, indeed, whatever VPC item you wish).
Some important takeaways:
- AWS App Runner is very handy when it is time to publish web applications. You provide the source code, and it takes care of the rest, autoscaling included. No system administration knowledge required.
- VPC Connector make it possible to connect the services running on AWS App Runner to a VPC.
- AWS .NET Deployment tool helps a lot: it provides the CDK project to deploy a web application to AWS App Runner. This can be updated with the code to include the VPC Connector using the official AWS CDK CfnVpcConnector documentation.
- The AWS App Runner development roadmap is public, and the community can contribute submitting and upvoting issues.
If you are interested in the source code of the app that I used for the demo, here is the GitHub repository.
Some helpful material: